Showing posts with label decoupage. Show all posts

Thursday, November 4, 2010

Snowmen in Love Box (Cutie "Oameni de zapada indragostiti")

I have to admit I would have never made this box from my own initiative.
I am not so much into snowmen, Santas and other Christmas characters.

However, my best friend insisted I made it to host a Christmas gift for her husband and now it's here and I actually love it. I love being challenged this way. I am currently working on my first landscape painting that stretches over 3 canvases so I guess I'll go back to painting now.


Monday, October 11, 2010

Vintage Box and Mirror Set (Set cutie si oglinda vintage)

Please bare with me for this last vintage rose decoupage set.
It's a mirror and a little trinket box I decorated for Florentina. I really hope she likes it and hopefully I haven't used too much pink.

Va rog sa mai aveti rabdare cu mine pentru acest ultim set cu trandafiri roz aplicati prin tehnica decupajului. Setul e format dintr-o oglinda si o cutiuta si sunt pentru Florentina. Sper ca nu e prea mult roz.


Self portrait (Autoportret)

That's me in the mirror playing with focus settings. I am trying to learn how to use my camera othar than on auto mode :)
In oglinda e reflectia mea in timp ce ma jucam cu setarile de focalizare in incercarea de a folosi apatul altfel decat pe modul auto.

Saturday, October 9, 2010

Another Pink Box With Roses (Inca o cutie roz cu trandafiri)

Can you tell I like vintage roses?
I have just one more project and then I am out of this gorgeous napkin design.

Of course I could buy some more if I really wanted (in fact I saw a few on E-bay) but my main project this autumn is to use up as much as I can of my stash to make room for the baby. I think my husband would have a good laugh if he read this as I am constantly piling up more things. Today he called my stuff "furniture" :). I don't think he even realized that huge box he was looking at was full of my "seasonal" materials.


Friday, October 8, 2010

Vintage Pink Decoupage Box ( Cutie roz-vintage)

Another one of the pink projects currently on my work table. A decoupage box in white and pink with vintage roses and handmade flower made from a recycled invitation.


I love these daisy type flowers with beads centres and I have been trying different color combinations that you will see incorporated in future projects.

Wednesday, February 10, 2010

Vintage Style Butterfly Box (Cutie in stil antic cu fluturi)

This is one of those boxes that you might have seen in a Victorian dress room.... Little black ebony table with curved legs.....

Aceasta este una din cuttile pe care ai fi putut-o vedea intr-o camera din epoca victoriana.... pe o masuta neagra din lem de abanos cu picioarele curbate...


Well, it's not that old.... I just made it yesterday at my best friend's request.
Ei, nu e chiar asa de veche! Am facut-o abia ieri :) la cererea celei mai bune prietene.

I love her! She comes to me whenever she needs a gift and she asks for a coordinated box or other gift and card (card coming soon). She already knows where all the craft shops are and she buys the plain boxes on her way to my place. Love the shape of this one!

Tare imi place de ea! De cate ori are nevoie de un cadou vine la mine sa-i fac o cutie sau alt cadou si felictare asortata (in curand si feliciatrea).
Cum stie deja unde sunt magazinele cu articole de craft, cand vine la mine se opreste si cumpara si cutiile in drum. Imi place forma acestei ultime cutii.

The pattern paper on the bottom is from the Earth Love Kit by Cosmo Cricket. While I don't like their cartoonish designs I do love this kit that is a little bit more towards elegant.
Hartia cu model este din setul Earth Love de Cosmo Cricket care imi place mai mult decat altele pentru ca inclina spre elegant.


Since Cuttlebug Be Inspired #70 challenge is using fabric I decided to show this to you. I love doing decoupage with pretty floral fabrics.

Avand in vedere ca tema concursului Cuttlebug Be Inspired #70 este folosirea textilelor, am decis sa va arat si voua cutia. Imi place sa fac decupaj cu materiale elegante cu motive florale.


The butterflies are cut and embossed with my cuttlebug. I wanted to use black butterflies but everyone in the room (we had homemade pizza day yesterday)said it looked like a mortuary box.
Looks like I have to make one for myself just the way I like it. I really like black lately. I think it's extreme elegance.

Fluturasii sunt taiati si embosati cu cuttlebug. Eu am vrut sa-i fac negri dar toata lumea din casa spunea ca pare pentru morti (ieri a fost zi de pizza facuta in casa). Se pare ca va tebi sa-mi fac eu o cutie complet neagra pentru mine. In ultimul timp imi place foarte mult negrul. Il consider de o eleganta extrema.


Check out what the other Cuttlebug Design team Members have made using fabric.
Look how cool is this napkin ring by Odette! Matches my box, right?

Vreti sa vedeti ce au creat ceilalti membrii ai echipei de designeri cuttlebug folosind textile?
Ce ziceti de acest inel pentru servetel creat de Odette? Se asorteaza cu cutia mea, nu?


Wednesday, December 16, 2009

White Butterflies on Blue Box (Fluturi albi pe cutia albastra)

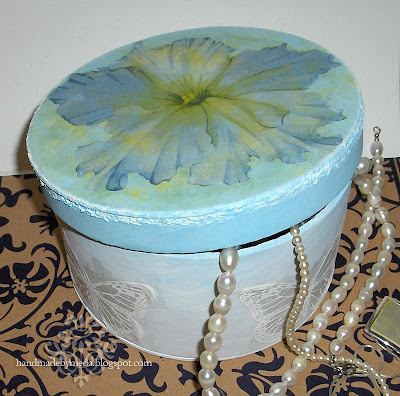
blue decoupage trinket box
On the fifth day of Christmas
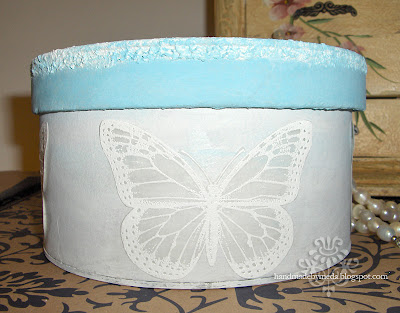
I made a blue box. And white butterfly came and set on it. Then a decoupage blue flower bloomed on the lid, then more butterflies and happy bugs came to embellish the inside.
In a cincea zi de Craciun am facut o cutie albastra si au venit fluturasi albi sa se aseze pe ea. Apoi pe capac a inflorit o floare albastra si alti fluturi si gaze vesele au venit sa inveseleasca interiorul.

cutie albastra pentru lucruri de pret

I made this box last year for a co-worker.
Cutia am facut-o anul trecut pe vremea aceasta pentru o colega de servici.


white butterfly blue box

On the Cuttlebug Challenge Blog, on the fifth day of Christmas they have some beautiful napkin rings.
In a cincnea zi de Craciun, la Cuttlebug Challenge Blog gasiti idei de inele pentru servetele.

Sunday, March 1, 2009

Sunflower Wedding Invitation (Invitatie de nunta cu floarea soarelui)


So the wedding season has started and I am in a very creative mood. Yesterday I design no less than 6 sunflower wedding invitations. Here is the first one.
Sezonul nuntilor a inceput, iar eu am creativitatea la maximul zilele acestea. Ieri am creat nu mai putin de 6 modele de invitatii cu floarea soarelui. Iat-o pe prima dintre ele.


The envelope is handmade from stripe patterned vellum. I repeated the sunflower motif from the invitation on the envelope as 3 D decoupage which makes it loook much more interesting.
Plicul este confectionat manual din hartie de calc cu model. Motivul floarea soarelui de pe invitatie se repeta si pe plic sub forma de decupaj 3D ceea ce-i da o nota mai interesanta.


Following is an inspiration board I made for you. I gathered the pictures from around the internet so you can have some ideas of items matching my invitations.
In continuare am cules pentru voi de pe internet cateva idei pentru o nunta care are ca tema floarea soarelui si se asorteaza cu invitatia mea.


Image credits: Sunflower cake,

See you in a few hours with another one of the 6 invitations I made yesterday.
Va astept in cateva ore pentru a va arata un alt model de invitatie cu floarea soarelui din cele 6 pe care le-am facut ieri.

Saturday, December 27, 2008

Decoupage Gift Box (Cutie cadouri decupaj)

Long time... no post. I did all kind of commission stuff lately so that explains my long absence. This gift box is just one of them.
Materials used: tree bark box, acrylic paint, paper napkin with flowers, decoupage glue, structure paste, butterfly rubber stamp, embossing ink, white embossing powder, white pearls.
Tools: brushes, scissors, heat gun.


In ultimul timp am facut tot felul de lucruri la comanda, ceea ce explica absenta mea de pe blog. Aceasta cutie pentru cadouri este doar unul dintre ele.
Materiale folosite: cutie din scoarta de copac, vopsea acrilica, servetel cu flori, adeziv pentru decupaj, pasta de structura, stampila cu fluture, cerneala si praf pentru relief, perle albe.
Unelte: pensule, foarfeca, pistol cu aer cald.

Sunday, November 9, 2008

Looking in the Mirror... (Privind in oglinda...)


When I look in the mirror I see things like this and I see someone who just loves to create art that is elegant as much as useful. I never keep what I make. except maybe for a very short while. It's the process of creating that defines who I am. The bigger the challenge, the happier the artist. So challenge me! I don't mind.


Cand ma privesc in oglinda vad lucruri ca cele din imagine si vad pe cineva care adora sa creze lucruri elegante si in aceeasi masura utile. Nu pastrez niciodata ceea ce creez, decat poate pentru foarte putina vreme. Ceea ce ma defineste este procesul creatiei. Cu cat e mai mare provocarea, cu atat e mai fericit artistul. Asa ca provocati-ma; nu ma supar.

Thursday, June 5, 2008

An Unusual Birthday Gift ( Un cadou neobisnuit)


This was one birthday gift that had to go with a user manual. Why? Because I myself didn’t know what it was until it was ready.
I had bought the styropor mushroom back in February thinking of my friend’s almost one year old daughter. The idea was to combine it with a chipboard photo frame to make a birthday gift. The actual result is not what I first had in mind. The initial frame was a big rectangle shape but something just didn’t work ok so I put the mushroom on a box and added the smaller heart shaped frame. The final result is a photo box with a mushroom and a frame where all the pictures from Sara’s first birthday can be kept.
The mushroom: styropor painted with acrylic paint. The mushroom had a hole in it so I made a little caterpilar from pottery clay to make it look like he had eaten from the mushroom.

The frame: just a plain chipboard frame painted with acrylic paint and added a strawberry image from a napkin.
The box: my husband had just bought a new cell phone and I thought the box was too nice to waste. So I covered it with white paper, added napkin decoupage with strawberries and a little acrylic paint and that was it. I left one of the sides uncovered to reveal the opening.


Acesta a fost un cadou care are nevoie de un manual de utilizare. De ce? Pentru ca nici eu nu am stiut ce va fi pana cand nu a fost gata.
Ciuperca din polistiren o cumparasem in februarie anticipand ziua de nastere a fetitei unei prietene. Planul initial era sa o combin cu o rama foto insa ceva nu-mi placea la rama aceea mare si dreptunghiulara. In timp ce scotoceam prin minte dupa o idee, mi-am amintit ca aveam o rama mai mica in forma de inimioara dintre cele pe care le daruiec celor care comanda invitatii. Mai aveam o cutie de la telefonul pe care tocmai si-l cumparase sotul meu, asa ca am pus ciuperca si rama pe cutie si gata.
Ciuperca: polistiren vopsit cu vopsea acrilica. Pentru ca ciuperca avea o gaura din fabricatie m-am gandit ca in loc sa o acopar, mai bine fac o omida din pasta pentru modelaj ca si cum aceasta ar fi mancat din ciuperca.
Rama: simpla, din carton, vopsita cu acril alb si cu o imagine cu capsuni decupata dintr-un servetel.
Cutia: initial neagra, am acoperit-o cu hartie alba, am aplicat capsunile pe lateral folosind tehnica decupajului si am pictat niste iarba deasupra. O parte a ramas neacoperita pentru a marca deschiderea pentru introducerea fotografiilor.

Friday, April 11, 2008

Orchid Treasure Box – Painting and Decoupage (Cutie cu orhidee - decupaj)


As promised, I have come back to show you the matching treasure box for the invitations in the previous post. It was a quick one because quick was all the time I had :)
Still I really love the result. Especially the two-color blending which is something that I tried for the first time. The heart shaped window is going to have a picture underneath. I would have put something different instead, but I was pretty sure they wanted a picture and I was right. The orchid image comes from a printed handmade paper I had bought for this project. I used decoupage glue to adhere it to the box.
I’ll have a similar project to share next week, but it will be green with tulips.
Thanks for looking.

Dupa cum am promis, iata cutia asortata cu invitatiile din articolul anterior. Am avut destul de putin timp la dispozitie, asa ca a trebuit sa lucrez mai repede decat imi place. Totusi sunt foarte multumita de rezultat si mai ales de tehnica amestecarii a 2 culori pe care am incercat-o pentru prima data. Prin fereastra in forma de inima se va vedea o poza. As fi pus altceva in loc de poza, dar eram destul de sigura ca viitori stapani vor dori o poza si am avut dreptate. Am decupat imaginea cu orhidee dintr-o coala de hartie fabricata manual pe care o cumparasem special pentru acest proiect.
Saptamana viitoare voi reveni cu un proiect asemanator, dar va fi de culoare verde si cu lalele.
Multumesc pentru vizita.

Sunday, March 30, 2008

Little Treasure Box


I have another decoupage box to show you this week. It is amazing what results you can achieve with this technique and the supplies you need are very cheap: decoupage glue and napkins. Acrylic paint is also something I use a lot with decoupage. For this little box I used black paint inside to give the whole project an elegant look. I also used golden acrylic in a thin layer on top of the decoupage images to unify them and create the look of an old treasure box. The box is small, but it can hold all your earrings or it can serve as jewellery box when you travel.

Friday, March 21, 2008

Keeping my Promise (Ma tin de promisiune)


Here I am, keeping my promise to post something new every week. This little box was a birthday present for a friend of mine. I was thinking of her red sandals when I chose the necklace and I also decided to use the poppy knowing how much she liked red.
The plain wooden box was varnished with a natural resin used for ancient furniture. I asked my grandma to do that for me (she has restored ancient furniture all her life). All I had to do was add the poppy image using the napkin decoupage technique. If you master the technique well enough, the images look like they had been painted directly on the object.

Am promis ca voi publica ceva nou pe blog in fiecare saptamana, deci iata ceva nou: Cutiuta aceasta a fost un cadou de ziua unei prietene. Am ales colierul rosu gandindu-ma la sandalele ei rosii. La fel si macul a fost ales datorita preferintei ei pentru rosu.
Cutia din lemn natur a fost lacuita cu selac (o rasina naturala flosita pentru lacuirea mobilei antice). Am rugat-o pe bunica sa faca asta, intrucat ea a reconditionat mobila antica toata viata. Am adaugat imaginea cu macul folosind tehnica decupajului, tehnica pe care daca o stapanesti bine imaginile par pictate direct pe obiect.

Saturday, February 16, 2008

For my Honey! (Pentru draga mea)


I'm not going to say for whose honey, but this was a gift I made for somebody's girlfriend for Valentine's Day.
The box:
One of the wooden boxes I have around the house was decorated using a damask design napkin and an embossed butterfly from Inkadinkado. After decorating the lid I decided to leave the rest just plain white in order not to overwhelm the design. As an additional touch I used the same napkin to decorate the inside.
The card:
I really like this card. And the reason I like it most is that it is almost entirely made out of scraps. I have many leftover pieces of cardstock from the invitations I made last year, so one day I pulled them out and said to myself: "I have to do something with these". The flowers are hand cut from red tissue (wrapping paper) and some paper ribbon (the only non scrap material I used). The butterflies are stamped on magazine paper and embossed. Watch this video for a tutorial on the magazine paper butterflies.

Cutia de bijuterii si felicitarea au fost cadoul de ziua Sf. Valentin pentru iubita unui prieten. Totul, inclusiv florile au fost realizate manual si la comanda pentru a se potrivi perfect persoanei careia i-au fost desinate si ocaziei cu care acest dar a fost prezentat.

Sunday, February 10, 2008

Frame Number 2 (Rama nr. 2)


I finally have a few minutes to show you frame no. 2.
The flowers are handmade by me, the butterfly is printed (leftover from some wedding favours), the baroque motifs are from a napkin. Flowers, pearls, butterflies... that's my signature. I feel like a princess living a dream life when I create.
I have many other projects just waiting to be photographed and sent to their new homes and many other projects waiting to be done. Hope to be back posting soon.
No Romanian translation today.

Saturday, January 26, 2008

Baby Hand Prints (Amprente de bebe)


Most of my friends have recently had their first babies so I started to make these frames as presents for them. The inside is going to be filled with some kind of modeling clay that will hold the baby's hand print and foot print. I'm sorry I can't show you a finished piece. I give them away like shown in the picture and the clay is in a sealed plastic bag because it air dries. I have another frame ready for a baby girl and have to make 1 more by Tuesday. Then I'll try using a different kind of frame for the same purpose.

Majoritatea prietenelor mele au deja primii copii, prin urmare am inceput sa le fac cadou aceste rame pentru amprente. Interiorul va fi umplut cu o pasta pentru modelaj sau ipsos in care bebelusul isi va lasa ampreta mainii si a piciorusului. Din pacate nu am o fotografie a unei rame cu amprente, pentru ca pasta pentru modelaj se usuca in contact cu aerul, deci trebuie sa stea intr-o punga inchisa inainte de a fi utilizata. Mai am o rama terminata pentru o fetita, una in lucru pe care o voi termina pana marti si apoi voi incerca sa folosesc alt tip de rama in acelasi scop.

Monday, December 17, 2007

A Gift Box for Christmas (Cutie de cadouri pentru Craciun)


I've had this chipboard box sitting around for a long time so I decided to transform it into a Christmas box. I only used 3 acrylic colors and 2 napkins to decorate it.

I prefer to decorate things with napkins than with stamps because the images are already coloured, you can choose from a very large variety of designs and they are cheaper. I buy 5 napkins for about $1. Of course they are cheaper in supermarkets, but who needs a whole pack of the same design?


Aveam de mult cutia aceasta de carton si am decis sa o transform intr-o cutie de cadouri pentru Craciun. Nu am folosit decat 3 culori de vopsea acrilica si 2 modele de servetele de colectie.

Prefer sa decorez obiecte cu servetele pentru ca fata de stampile prezinta 3 avantaje: imaginile sunt deja colorate, poti alege dintr-o foarte mare varietate de modele si sunt mai ieftine (0.5 RON bucata). Evident, sunt mai ieftine in supermarketuri, dar ce sa faci cu un pachet din acelasi model?


Thursday, October 18, 2007

Wood You Say? (Lemn zici?)


I've seen that everyone on SCS is doing wood projects. Well, I have done a lot of those. I decided to share my first altered wooden box today.

Văd că toată lumea de la Splitcoaststampers lucrează azi cu lemn. Am făcut şi eu o mulţime. Iată prima cutie din lemn pe care am decorat-o.

Wednesday, October 17, 2007

Napkin Decoupage Flower Pot (Ghiveci decorat cu şerveţel)


This is a flower pot I have decorated using a napkin and a decoupage glue to try out the decoupage technique on ceramics. You can also use Mod Podge or white craft glue (I don't know the English word, but it starts with PV.... :) ...  )  It also takes a little bit of practice to master the technique. Start with only small images and move on to larger ones. Also it could help working on straight surfaces first.
Acesta e un ghiveci pe care l-am decorat cu un şerveţel pentru a testa tehnica decupajului pe ceramică. Există adezivi speciali pentru decupaj, dar se poate folosi şi aracetul. Pentru a stăpâni bine această tehnică e nevoie de puţin exerciţiu. Începeţi cu imagini mai mici, trecând apoi la altele mai mari. De asemenea, e mai uşor să lucrezi pe suprafeţe plane.