Showing posts with label tutorials. Show all posts

Tuesday, November 20, 2012

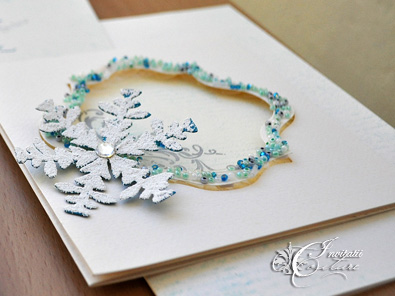
How to Make a Beaded Frame for your Stationery (Cum sa faci o rama cu margele pentru invitatii sau felicitari)

This was not meant to be a tutorial, but mixing the beads for the frames was such a pleasant activity that I took some photos while doing it. I will explain the rest of the process in words.

Materials: cardstock frame, white PVA glue, beads in the colors of your choice.

My favorite part was choosing and mixing the beads.

*******

Pentru a realiza aceste rame aveti nevoie de rame decupate din carton, aracet si margele in culorile preferate pe care urmeaza sa le amestecati. 

Then comes the unpleasant part. You have to cover your frame with a good amount of glue and pour the bead mix over it. Use a tooth pick to arrange the overlapping or stray beads, then let the frames dry over night.

*******

Acoperiti ramele cu o cantitate generoasa de aracet si presarati margelele. Folositi scobitori pentru a le aranja pe cele ratacite sau suprapuse si lasati la uscat peste noapte.

Use these frames to make Christmas cards,wedding invitations or other stationery, gifts and decorations.
Don't worry if some of the beads fall off, there will be enough left to keep their beauty.

******

Folositi ramele pentru a realiza felicitari, invitatii, decoratiuni etc.
Nu va faceti probleme daca mai cade cate o margeluta. Nu se va observa lipsa ei.


Friday, December 23, 2011

Last Minute Wrapping Paper Tutorial


So you just realized tomorrow morning you are meeting a friend and don't have any wrapping paper for her Christmas gift. If you are me (one year ago when baby was still in the womb) you don't worry much because you can make your own.

Take one sheet of ordinary white wrapping paper. I keep a stash of such materials that are too good to go to waste.

Gather some art supplies that you have around the house. If I had nothing else but a set of acrylics and a paint brush, that would be enough.

Start covering your paper with paint. Here I have used a dark palette of browns and black. Try not to think to much while doing it. Just have fun and do not over do it so the individual colors can still show.


Once you are happy with the background, start decorating your paper.
I am using a wooden print block from India (thanks Laura), but you can use so many things (stamps, fruit-as-stamps, gel pens, inks). Your imagination is the limit.

You can stop here, or, if you are into details like I am, this will seem to easy and in need of some harder work :). Take a no. 2 brush and start adding details using gold acrylic paint.

Finish up the edges of the paper with more gold paint.

Let it dry for 5 minutes (that is all it takes, really), wrap your gift and go to bed because it's past midnight, you have a migraine and you need to breastfeed baby in a few hours :)


Friday, December 3, 2010

Upcycled Sweater Christmas Globes Tutorial


This Christmas my goal is to unclutter my apartment. I have way too many clothes in my wardrobe and I have set out to find creative ways to use them. I know many of you are like me. I was recently reading on a blog that we "crafters are organized hoarders". Well, lets craft some more and use use up our stashes or wardrobes in this case.

Take a comfortable seat on your couch with an old sweater, a pear of scissors and a newspaper.


Unthread your sweater and make some balls from your newspapers. You can also buy styrofoam balls, but why spend money when you can have them for free.


Roll the yarn on your balls until the newspaper is covered. I used a crochet needle to hide the end of the yarn.

Embellish as you like using whatever you have available in your stash. Here are mine:

(hung on a Christmas tree)


(tied in a bunch with a golden bow)


(wrapped up in a matching box ready to give away as Christmas present)

Friday, February 19, 2010

A Week in My Studio (O saptamana in atelierul meu)

[Cititorii in limba romana sunt rugati sa foloseasca instrumentul de traducere de pe coloana din dreapta. Imi pare rau, dar timpul nu imi permite sa scriu toata traducerea.]


Welcome to my studio!
Today we are going to start making 55 invitations for Cindy's masquerade birthday party.

Yes, you read right: 1 week for 55 invitations. Do you still want to make invitations? hehe... you really have to love it in order to be able to make something like this. It is no easy job. Sorry to discourage you.

This is what we are going to make.

black white and gold masquerade invitationI have already made the design, sent a proof to Ciny for approval, ordered the materials, so only the actual production part is left. Don't ask how much the initial preparation took because I don't quantify it. That is real pleasure to savor.


The first step is to trace the masks.

tracing the masks

Then cut along the traced lines. I used scissors for the outside and X-acto knife for the inside.

cutting the masks

Emboss the masks with the cuttlebug and Victoria folder. Thank you, Provo Craft, I love this design :)

embossing the masks

Since the paper we are using for the masks is Core'dinations White Wash (which along with Black Magic is my favorite of their line), we are now sanding the embossed design to reveal the beautiful core in shades of pink. Then sponge some gold paint for added intricacy.

sanding and sponging the masks

Finish off the mask with a black embossed fleur de lis also from Provo Craft. Thanks again, I love this design too and i also love the Textile folder (these are my top 3).

mask assembling

Prepare the gatefold cards, emboss, sponge gold ink, adhere inside gold layer. This is basic stuff, you know how to to it, right?


Adhering the masks to the cards. These is the point where you ad the feathers too.

adhering the masks to the cards

We are almost ready. All we need is to adhere the final vellum layer.

cards ready

Although I have 2 paper trimmers, I sometimes prefer using a ruler and craft knife. It gives me much more precision. ....talking about "HAND MADE"

cutting vellum

Invitations ready. They were sent to guests in golden envelopes. Sorry I don't have a picture of them.

invitations ready

Thursday, February 4, 2010

Masking Techniques Tutorial (Tutorial: Tehnici de masking)

[Pentru traducere, va rog folositi widgetul de traducere de pe bara din dreapta. Lasati un comment daca nu va descurcati si incerc sa traduc intregul tutorial]

Second post today following Donna's comment.

Thank you, Donna, I didn't realize not everyone understands what the masking technique is about.
So here I am; with today's last sun rays I took some quick photos to show you various masking techniques.

[Click on images for larger view]

Supplies:


masking tutorial supplies

For this technique you need 2 basic types of materials: masks (or stencils) and coloring mediums.

You can buy stencils from craft stores (Tattered Angels has some marvelous ones) or you can make your own using various tools like punches, dies, free hand cutting, or any object that will cover a surface (try a jar lid to mask a circle :)

Also the coloring medium choices are very large. You can use colored pencils, chalks, inks, spray colors, acrylic paint, so Donna, you don't need Glimmer Mist to participate in this week's challenge.

Masking techniques (Tehnici de masking).


Masking consists in covering a surface with a "mask" or stencil and coloring the surface left uncovered.


1. Masking with colored pencils (Masking cu creioane colorate).

I have known this technique ever since I can remember. As a little girl I used to draw flowers, cut them out and use them as masks like shown in the images below. I haven't tried watercolor pencils, but they must be great for this technique. You need a wet finger to pull the color.

masking with colored pencils
2. Masking with inks and paints (Masking cu cerneala sau vopsea).


Shown below is masking with an ink pad. You can do the same using a make-up sponge and ink or acrylic paint or anything that leaves a color trace (try some concentrated tea or coffee). There are also special stenciling brushes but they are better for larger surfaces lie walls or furniture.

masking with ink

3. Masking with Glimmer Mist and spray paints (Masking cu Glimmer Mist sau vopsele spray).

This technique is a very messy one so be sure to cover your work surface and put away card blanks or any other thing that could get spritzed and cannot be cleaned. You can use a box and do the spritzing inside, but I am too lazy for that. You basically have to cover the surface you don't want touched by color and spray. Lift the mask and you are done. This is how I did the little heart on my card from the previous post.


Saturday, January 3, 2009

A Peek Into My World (O privire in lumea mea)

One of the things I wrote in my new year resolution card is to let you have a peek into my creative world. I hope I will find time for that and I hope I will be able to take better pictures after we move into our new apartment where I should have better day light.

This is what I am making right now. It is for a challenge on the Cuttlebug Challenge blog. So come back tomorrow to see how I make a card for a challenge.

Any cuttlebug lovers? The same blog has a design team call. Follow this link to find the details.


Una dintre dorintele de anul nou pe care le-am scris in felicitarea mea de Revelion este sa va las sa aruncati o privire in lumea mea creativa. Sper ca voi gasi timp pentru asta si sper ca voi reusi sa fac poze mai bune dupa ce ne vom muta in noul nostru apartamet care este mai luminos decat acesta in care locuim acum.

Iata la ce lucrez in momentul de fata. Este o felicitare pentru un concurs de pe blogul Cuttlebug Challenge Va astept maine pentru a va arata cum.